My previous project explored the accelerometer and gyroscope sensors in an MPU-6050 IMU chip, and showed how the data from both sensors could be combined for greater overall accuracy. While the project was interesting, the programming and data processing was too far above my kids’ heads for me to share with them.
I wanted to do a similar but simpler project that my kids would find interesting. It turns out that the Wii Nunchuck controller contains an accelerometer and the Wii Motion Plus controller contains a gyroscope sensor, both of which communicate over the I2C bus. I thought that it would be a fun, kid-friendly project to hack these controllers to manipulate some object in the real world. Fortunately, others have had this idea before me, and there are some well-documented projects online.
We decided to use a Wii controller to control a couple of servo motors. The components we used for this project were:
- a WiiChuck Adapter – this allows easy communication between a Wii controller and an Arduino
- Arduino Uno microcontroller and USB A-B cable for programming
- Two small servo motors (small enough to be powered by the output of an Arduino Uno)
- Breadboard and jumper cables
- A Wii Nunchuck controller
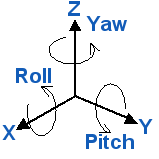
The first step was to obtain the data from the Wii controller. I’d initially wanted to use the Wii Motion Plus (WMP) controller and its gyroscope sensor, since a gyroscope sensor yields information about three rotational axes. Gyroscope sensor data, however, are prone to significant drift, which makes it difficult to consistently control a servo’s rotation angle over any significant time period.
So that left the Wii Nunchuck controller as the best option. The Wii Nunchuck contains a three-axis accelerometer from which we can compute rotation about two coordinate axes (pitch and roll, but not yaw). Accelerometers are prone to high-frequency noise from external forces and acceleration, but time averaging the data can help to eliminate some of the noise.
To get the accelerometer data, we hooked up the WiiChuck Adapter to the Nunchuck following the instructions here. It couldn’t be much easier. One end of the WiiChuck adapter fits nicely into the Nunchuck connector, and once you solder in four header pins to the WiiChuck, they plug directly into pins A2 through A5 on the Arduino Uno.
The next step was to see what kind of data we were getting from the accelerometer in the Wii Nunchuck. The Arduino has a ready-made library for interfacing with a Wii Chuck adapter here: http://playground.arduino.cc/Main/WiiChuckClass. I installed the library and downloaded the sample program provided.
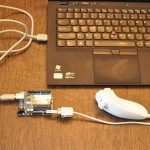
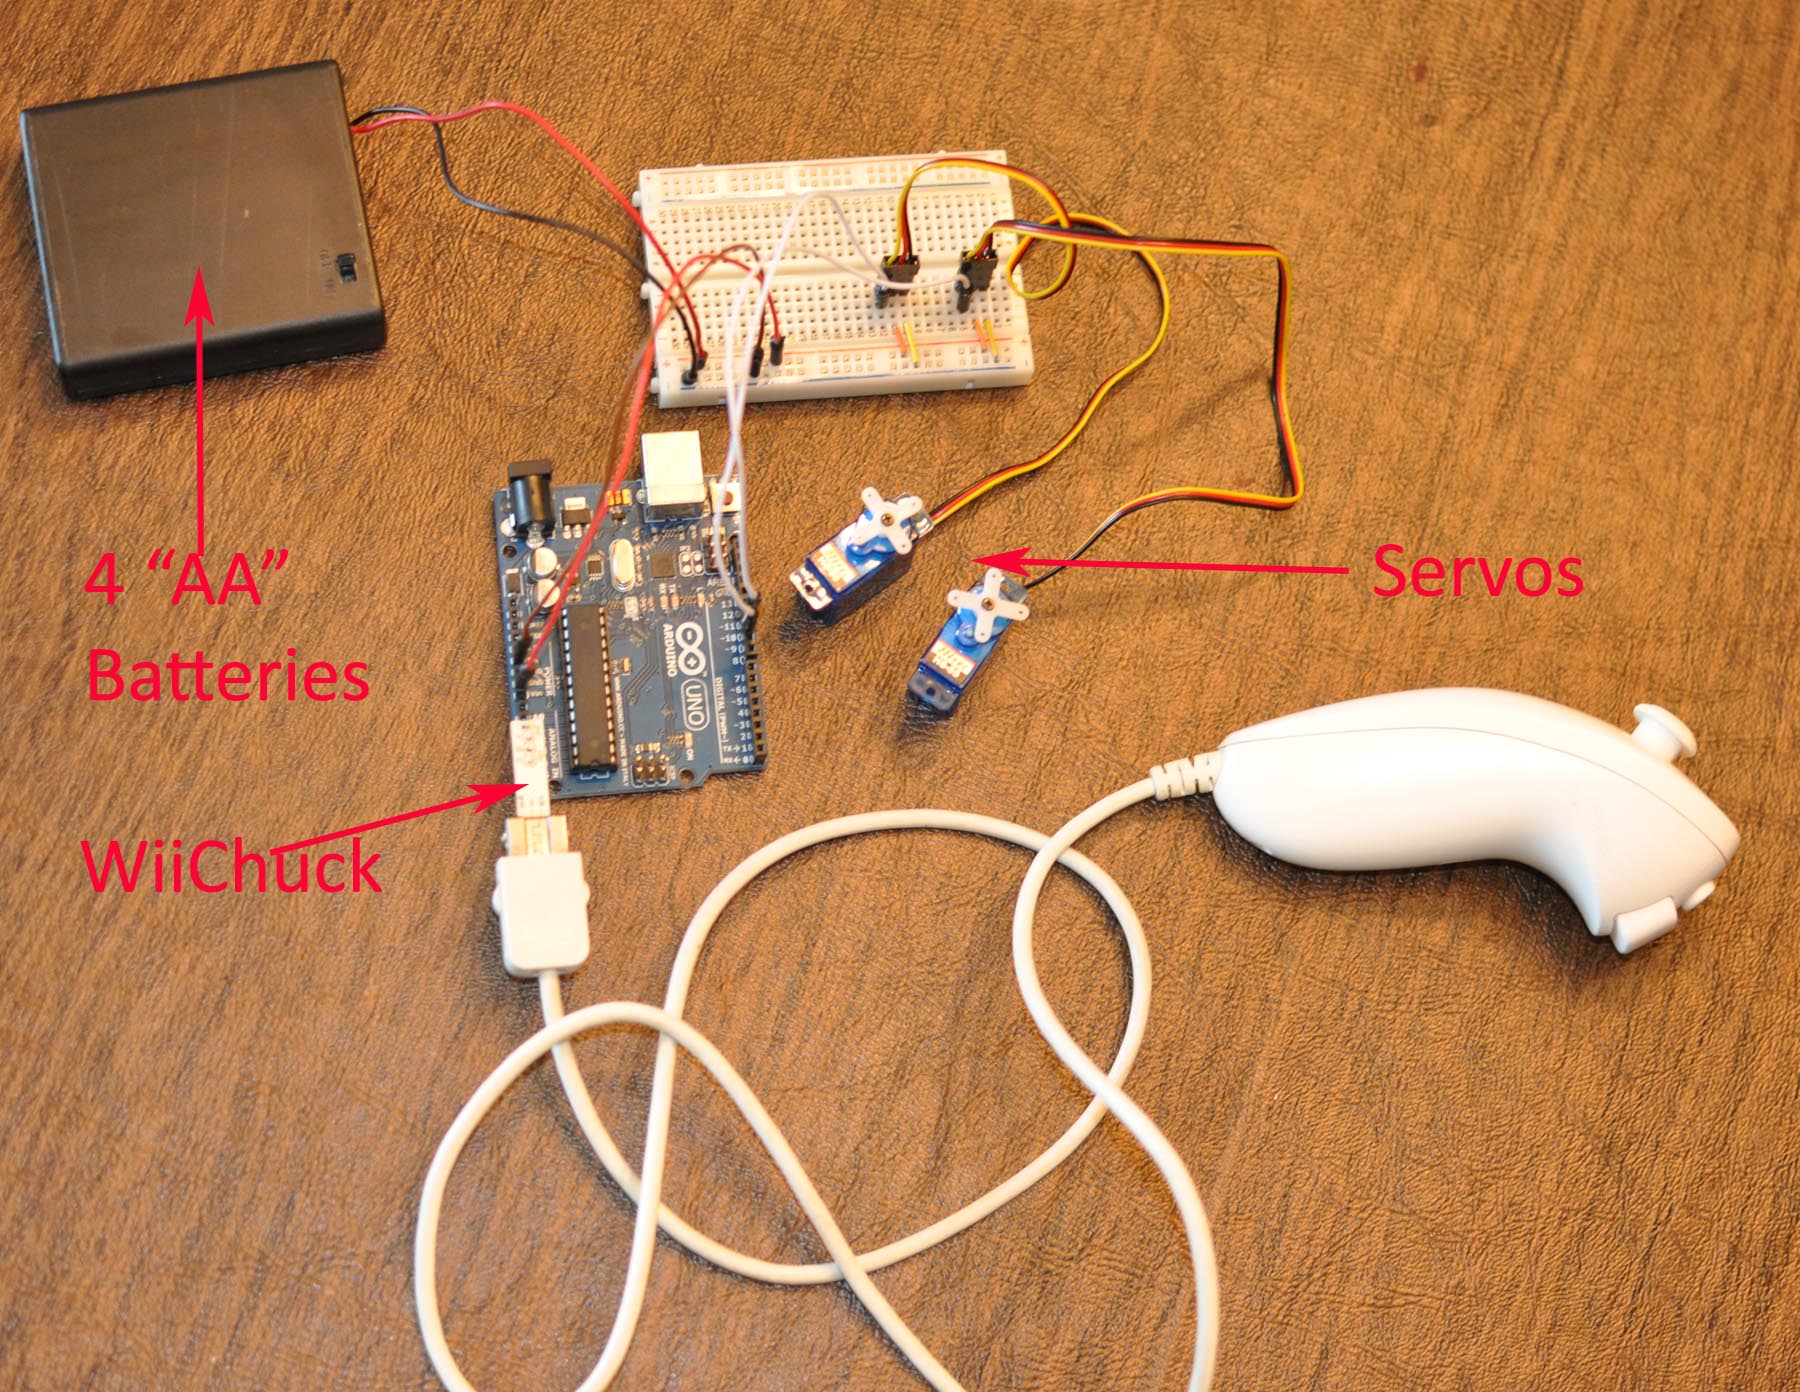
The WiiChuck class takes care of computing the pitch and roll data. The sample program below came directly from the Arduino.cc WiiChuckClass example and runs easily with the setup shown at right, with the Arduino Uno connected to a computer via the USB port.
[codebox 1]Running the test program yields data that looked like this, and the data changed appropriately with the rotation angle of the Wii Nunchuck (roll, pitch, x_accel, y_accel, z_accel):
57, 77, 385, 45, 243
53, 61, 237, 101, 175
36, 77, 101, 45, 139
-31, 67, -95, 81, 155
-59, 56, -235, 117, 139
…
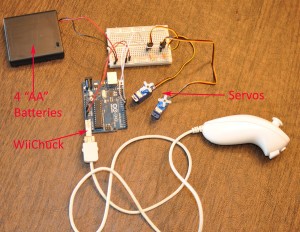
The next step was then to add the servo motors to the setup and write a program to coordinate their movements with the Wii Nunchuck readings. The default Arduino IDE comes with a “Servo” class to make controlling servos easy. We got a breadboard and two servo motors. Each servo has three pins for power, ground, and control. We hooked up one servo control input to each of Arduino pins 10 (roll axis) and 11(pitch axis) since Arduino pins 9, 10 and 11 can provide the Pulse Width Modulation necessary to control servo rotation. A battery box with 4 AA batteries provided power. We adapted the sample code to control the servos. Note that the roll data runs from -90 to 90 degrees and the pitch data runs from 0 to 180 degrees while servo rotation angles are generally specified between 0 and 180 degrees. The code we used is below:[codebox 2]
The program worked well, though I found that the servos showed a lot of jitter. The “pitch” servo was much more prone to the jitter than the “roll” servo. The code shows a few of steps we took to try to smooth the data out. We averaged the data over 5 readings before writing to the servos (averaging for longer smooths the data more but increases time lag in the servo response). We also rounded to the nearest 5 degrees and only wrote to the servos if the angle changed. In the end, none of these algorithms fully eliminated the servo jitter. I assume that it is partially due to my inability to produce smooth enough rotation about only a single axis when I move the Wii Nunchuck, partially due to noise in the accelerometer readings and partially a function of the servos. Still, even with the jitter, it is easy to see the correspondence between the motion of the Nunchuck and the servo motors in the video below:
One last thing. The coding for this project was pretty easy because we were able to use the “WiiChuck” and “Servo” classes from the Arduino libraries. If you would like a more in-depth understanding of exactly what is happening when we read the Wii Nunchuck data and when we tell a servo to move to a certain angular position, I strongly recommend reading the tutorial by Tod E. Kurt at: http://todbot.com/blog/2007/11/24/bionic-arduino-class-notes-3-4/. Click the “bionic_arduino_class_4.pdf” link for a more in-depth explanation and well commented sample code.

I tried writing the same code for it, but it keeps telling me ‘WiiChuck’ does not name a type, what can I do to fix this? please message back as soon as possible, thank you.
Try following these directions: http://forum.arduino.cc/index.php?topic=50921.0
Hi
i want to use a wiimote to be my sensors of balancing robot, is this code enough for me? if no what i can do please advice me.
This guy did it. I’d start by looking here: http://letsmakerobots.com/node/26095/
Hi, I’m trying to make a version of this using only one “roll” servo – I’m having the same problem as written above, where ” ‘chuck’ does not name a type” – I have successfully installed the Wiichuck.h library, so is the problem with the WiiChuck chuck = WiiChuck(); definition? The errors only occur when chuck. is written.
Are you sure your WiiChuck library files are installed in the correct location? Usually they go in a folder called ‘libraries’ inside the default folder for your Arduino sketches (as shown in http://arduino.cc/en/Guide/Libraries) It does sound like the compiler is not finding the source code for the “WiiChuck” class.
I downloaded the library from this link https://github.com/coopermaa/Wiichuck and it’s in the correct location, I am able to import it to the sketch. I basically skipped ahead to the last code written here. The error I’m getting is that chuck is not declared. Apologies, I’m very new to this! Do I need to install a different library? If so, does the code in the WiiChuckClass link above come as a zip file somewhere?
I’m sorry I can’t be of more help, but I’m not sure of the exact problem. It does seem from your error that the library source code is not being found correctly. You might try looking at another few WiiChuck online examples like this one: http://www.instructables.com/id/Using-WiiChuck-Adapter-with-Arduino/. I found my original examples here: http://todbot.com/blog/2008/02/18/wiichuck-wii-nunchuck-adapter-available/, so maybe that will be helpful.
Hello Rachel,
take the following code and put it into the WiiChuck folder in the libaries folder.
Rename all the other WiiChuck.h to old or similar.
Greetings From Denmark Gregor
//-WiiChuck.h
/*
* Nunchuck — Use a Wii Nunchuck
* Tim Hirzel http://www.growdown.com
*
notes on Wii Nunchuck Behavior.
This library provides an improved derivation of rotation angles from the nunchuck accelerometer data.
The biggest different over existing libraries (that I know of ) is the full 360 degrees of Roll data
from teh combination of the x and z axis accelerometer data using the math library atan2.
It is accurate with 360 degrees of roll (rotation around axis coming out of the c button, the front of the wii),
and about 180 degrees of pitch (rotation about the axis coming out of the side of the wii). (read more below)
In terms of mapping the wii position to angles, its important to note that while the Nunchuck
sense Pitch, and Roll, it does not sense Yaw, or the compass direction. This creates an important
disparity where the nunchuck only works within one hemisphere. At a result, when the pitch values are
less than about 10, and greater than about 170, the Roll data gets very unstable. essentially, the roll
data flips over 180 degrees very quickly. To understand this property better, rotate the wii around the
axis of the joystick. You see the sensor data stays constant (with noise). Because of this, it cant know
the difference between arriving upside via 180 degree Roll, or 180 degree pitch. It just assumes its always
180 roll.
*
* This file is an adaptation of the code by these authors:
* Tod E. Kurt, http://todbot.com/blog/
*
* The Wii Nunchuck reading code is taken from Windmeadow Labs
* http://www.windmeadow.com/node/42
*
* Conversion to Arduino 1.0 by Danjovic
* http://hotbit.blogspot.com
*
*/
#ifndef WiiChuck_h
#define WiiChuck_h
#include “Arduino.h”
#include
#include
// these may need to be adjusted for each nunchuck for calibration
#define ZEROX 510
#define ZEROY 490
#define ZEROZ 460
#define RADIUS 210 // probably pretty universal
#define DEFAULT_ZERO_JOY_X 124
#define DEFAULT_ZERO_JOY_Y 132
class WiiChuck {
private:
uint8_t cnt;
uint8_t status[6]; // array to store wiichuck output
uint8_t averageCounter;
//int accelArray[3][AVERAGE_N]; // X,Y,Z
int i;
int total;
uint8_t zeroJoyX; // these are about where mine are
uint8_t zeroJoyY; // use calibrateJoy when the stick is at zero to correct
int lastJoyX;
int lastJoyY;
int angles[3];
bool lastZ, lastC;
public:
uint8_t joyX;
uint8_t joyY;
bool buttonZ;
bool buttonC;
void begin()
{
Wire.begin();
cnt = 0;
averageCounter = 0;
// instead of the common 0x40 -> 0x00 initialization, we
// use 0xF0 -> 0x55 followed by 0xFB -> 0x00.
// this lets us use 3rd party nunchucks (like cheap $4 ebay ones)
// while still letting us use official oness.
// only side effect is that we no longer need to decode bytes in _nunchuk_decode_byte
// see http://www.arduino.cc/cgi-bin/yabb2/YaBB.pl?num=1264805255
//
Wire.beginTransmission(0x52); // device address
Wire.write(0xF0);
Wire.write(0x55);
Wire.endTransmission();
delay(1);
Wire.beginTransmission(0x52);
Wire.write(0xFB);
Wire.write((uint8_t)0x00);
Wire.endTransmission();
update();
for (i = 0; i 5) {
lastZ = buttonZ;
lastC = buttonC;
lastJoyX = readJoyX();
lastJoyY = readJoyY();
//averageCounter ++;
//if (averageCounter >= AVERAGE_N)
// averageCounter = 0;
cnt = 0;
joyX = (status[0]);
joyY = (status[1]);
for (i = 0; i < 3; i++)
//accelArray[i][averageCounter] = ((int)status[i+2] << 2) + ((status[5] & (B00000011 <> ((i+1)*2)));
angles[i] = (status[i+2] << 2) + ((status[5] & (B00000011 <> ((i+1)*2)));
//accelYArray[averageCounter] = ((int)status[3] <> 4);
//accelZArray[averageCounter] = ((int)status[4] <> 6);
buttonZ = !( status[5] & B00000001);
buttonC = !((status[5] & B00000010) >> 1);
_send_zero(); // send the request for next bytes
}
}
// UNCOMMENT FOR DEBUGGING
//byte * getStatus() {
// return status;
//}
float readAccelX() {
// total = 0; // accelArray[xyz][averageCounter] * FAST_WEIGHT;
return (float)angles[0] – ZEROX;
}
float readAccelY() {
// total = 0; // accelArray[xyz][averageCounter] * FAST_WEIGHT;
return (float)angles[1] – ZEROY;
}
float readAccelZ() {
// total = 0; // accelArray[xyz][averageCounter] * FAST_WEIGHT;
return (float)angles[2] – ZEROZ;
}
bool zPressed() {
return (buttonZ && ! lastZ);
}
bool cPressed() {
return (buttonC && ! lastC);
}
// for using the joystick like a directional button
bool rightJoy(int thresh=60) {
return (readJoyX() > thresh and lastJoyX <= thresh);
}
// for using the joystick like a directional button
bool leftJoy(int thresh=60) {
return (readJoyX() = -thresh);
}
int readJoyX() {
return (int) joyX – zeroJoyX;
}
int readJoyY() {
return (int)joyY – zeroJoyY;
}
// R, the radius, generally hovers around 210 (at least it does with mine)
// int R() {
// return sqrt(readAccelX() * readAccelX() +readAccelY() * readAccelY() + readAccelZ() * readAccelZ());
// }
// returns roll degrees
int readRoll() {
return (int)(atan2(readAccelX(),readAccelZ())/ M_PI * 180.0);
}
// returns pitch in degrees
int readPitch() {
return (int) (acos(readAccelY()/RADIUS)/ M_PI * 180.0); // optionally swap ‘RADIUS’ for ‘R()’
}
private:
uint8_t _nunchuk_decode_byte (uint8_t x)
{
//decode is only necessary with certain initializations
//x = (x ^ 0x17) + 0x17;
return x;
}
void _send_zero()
{
Wire.beginTransmission (0x52); // transmit to device 0x52
Wire.write ((uint8_t)0x00); // sends one byte
Wire.endTransmission (); // stop transmitting
}
};
#endif
Hello,
I try to make a simpel gyro camera based on Your code.
My programming level is beginner.
So I like to ask how to run the servo revers of the nunchuck roll axis, like if nunchuck says 180 degrees the servo goes to 0 degrees.
Else the code works super. I tried to adapt it to a use on a attiny85 without succes, lack of my programming skills.
With greetings from Denmark
Gregor
Is it possible to control the servos with the stick on the nunchuck, so that when I push the stick to the left or right, one servo is controlled and when I push it up or down, the other servo is controlled? and if yes, how do I do it? Thanks in advance for the help! (Also this is my first project with coding something so I’m a beginner at this)
Great job!!!! Is it possible to drive DC motors this way? I have searched to no avai.